
October 18, 2026
Hydrangea Pot Crochet Pattern: A Sweet Floral Crochet Project
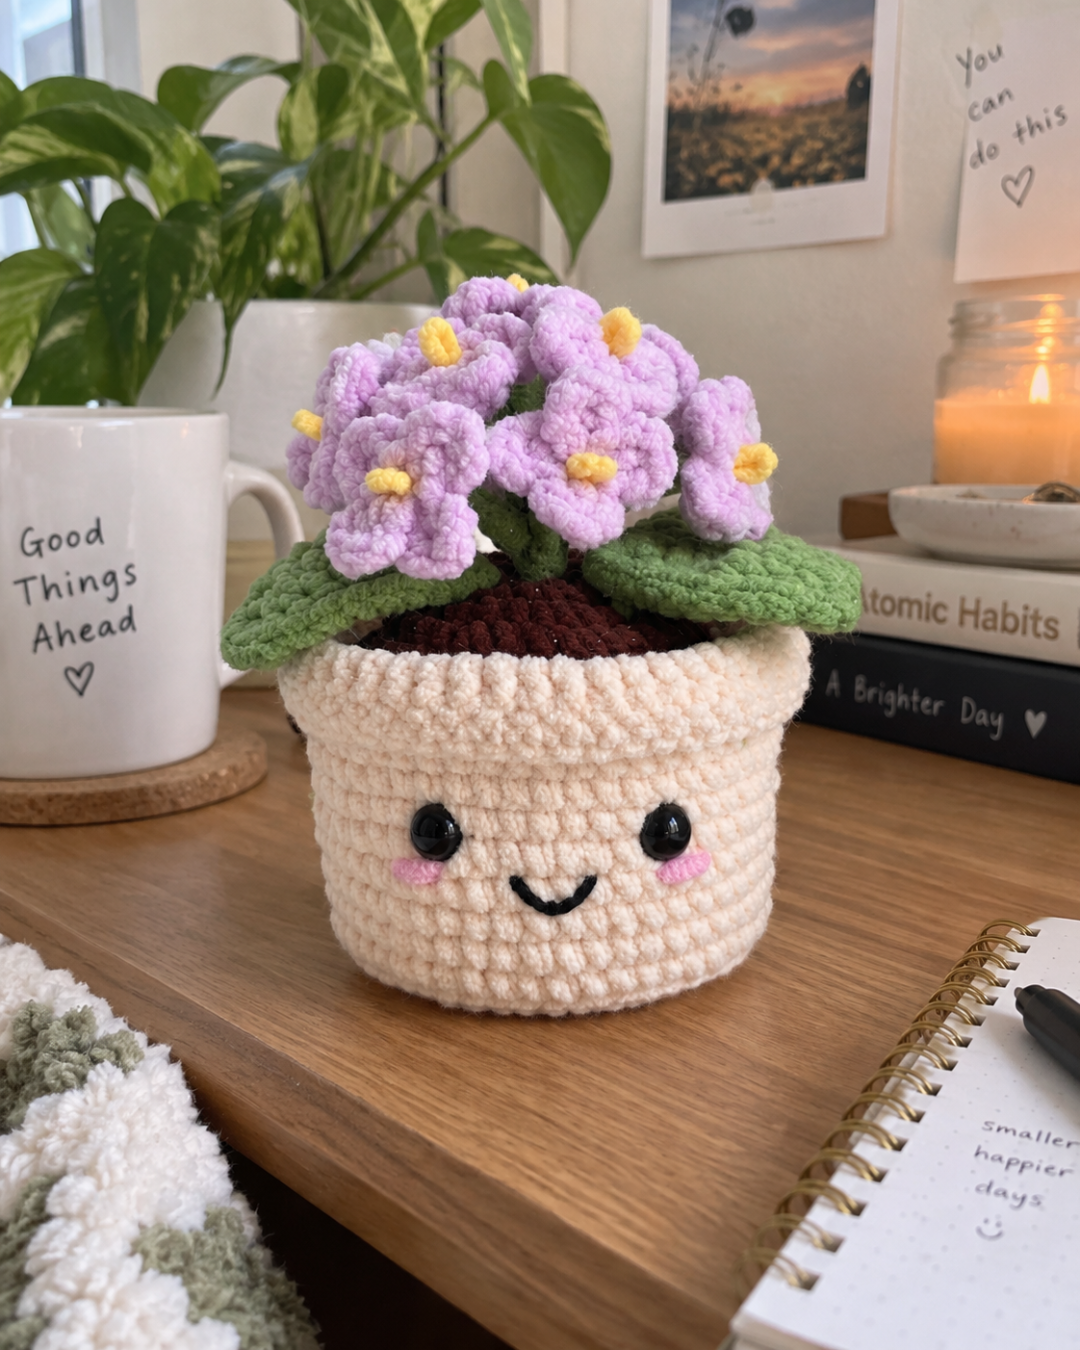
There’s something especially cheerful about a crochet project that combines flowers, a cute little face, and a finished piece you can display all year long. This hydrangea pot crochet pattern brings all of those details together in one adorable project. The finished design features a beige crochet pot with a smiling face and rosy cheeks, a fitted section of dark brown soil, three green leaves, and a full cluster of ten purple hydrangea flowers rising from the center.
I love projects like this because there are several small parts to work on instead of one long stretch of repetitive crochet. You can finish the pot, move on to the soil, make a few leaves, and then settle into crocheting the tiny flowers. Once everything is assembled, those individual pieces suddenly turn into a charming little potted hydrangea.
The crochet itself uses familiar stitches such as single crochet, half double crochet, and double crochet, along with increases, decreases, back-loop work, and a magic ring. The flower stems also introduce a little wire work, so I’d recommend this project for a confident beginner who is comfortable with basic amigurumi construction or an intermediate crocheter looking for a relaxing decorative make.
JUMP TO
Table of Contents
What You’ll Need
The original pattern specifies several yarn colors for the different parts of the hydrangea pot. You’ll need beige yarn for the pot, dark brown yarn for the soil, green yarn for the leaves and stem wrapping, purple yarn for the flowers, black yarn for the smiling mouth, and pink yarn for the blush. The flower pistils use size 2 yellow yarn.
You’ll also need eyes for the face, since the pattern marks their placement during Row 11 and instructs you to attach them afterward. The original pattern does not specify the eye size.
For the flower centers and stems, you’ll need wire stems. A yarn needle is also specifically used during assembly to sew the three leaves onto the soil. Stuffing is needed for the soil section where the pattern instructs you to stuff before completing the decreases.
A crochet hook is required to make the project, but no hook size is given in the original instructions. Yarn weights are also not specified, so I would keep that in mind when gathering your supplies rather than assuming a particular weight or hook combination.
Skill Level, Gauge & Time Estimate
I’d place this hydrangea project around the confident beginner to intermediate level based on the techniques included. The crochet stitches themselves are approachable, but the project asks you to work in a magic ring, crochet in the back loop only, shape pieces with increases and decreases, work around both sides of a foundation chain, embroider facial details, sew components together, and assemble flowers using wire stems.
The flower motif is short, but you’ll make ten of them. You’ll also form a pistil for each flower and wrap part of each wire stem with green yarn before gathering the flowers together.
No gauge is provided in the original pattern, so there isn’t a gauge measurement to match. Finished dimensions are not listed either.
A specific completion time is also not provided. Because the project contains several individual components and assembly steps, it’s the kind of make that can easily be divided into smaller sessions. You might crochet the pot and soil first, make the leaves and flowers separately, and save the wire work and final assembly for another session.
Abbreviations Used
These are the abbreviations used in the original pattern:
- MR = Magic Ring
- ST(s) = Stitch(es)
- SLST = Slip Stitch
- CH = Chain
- SC = Single Crochet
- DC = Double Crochet
- HDC = Half Double Crochet
- INC = Increase
- DEC = Decrease
- BLO = Back Loop Only
- FLO = Front Loop Only
Pattern Instructions: Hydrangea Pot Crochet Pattern
Pot
Use beige yarn.
Row 1: 8 SC in MR. (8)
Row 2: 8 INC. (16)
Row 3: (SC, INC) ×8. (24)
Row 4: (SC, INC, SC) ×8. (32)
Row 5: (3 SC, INC) ×8. (40)
Row 6: (2 SC, INC, 2 SC) ×8. (48)
Row 7: BLO in all stitches, 48 SC. (48)
Rows 8–10: 48 SC. (48) — 3 rows total.
Row 11: 20 SC, mark first eye position, 8 SC, mark second eye position, 20 SC. (48)
Rows 12–16: 48 SC. (48) — 5 rows total.
Attach the eyes in the marked positions.
Row 17: Ch 2, 48 DC. (48)
Row 18: 48 SC. (48)
Cut yarn.
Fold Row 17 down.
Using black yarn, embroider a smiling mouth on Row 10.
Using pink yarn, embroider blush beneath both eyes.
Weave in the ends and cut.
Soil
Use dark brown yarn.
Row 1: 7 SC in MR. (7)
Row 2: 7 INC. (14)
Row 3: (SC, INC) ×7. (21)
Row 4: (SC, INC, SC) ×7. (28)
Row 5: (3 SC, INC) ×7. (35)
Row 6: (2 SC, INC, 2 SC) ×7. (42)
Rows 7–12: 42 SC. (42) — 6 rows total.
Row 13: (2 SC, DEC, 2 SC) ×7. (35)
Row 14: (3 SC, DEC) ×7. (28)
Row 15: (SC, DEC, SC) ×7. (21)
Stuff.
Row 16: (SC, DEC) ×7. (14)
Row 17: 7 DEC. (7)
Weave in the end and cut.
Leaves — Make 3
Use green yarn.
Ch 10.
Starting in the 2nd CH from hook, work on both sides of the foundation chain:
Row 1: 2 SC, HDC, 4 DC, HDC, 3 SC in one st, HDC, 4 DC, HDC, 2 SC. (19)
Cut yarn and leave a long tail for sewing.
Hydrangea Flowers — Make 10
Use purple yarn.
Make MR.
Work into MR:
(Ch 2, DC, Ch 2, sl st) ×4.
Weave in the ends and cut.
Flower Pistils & Stems
For each flower:
Step 1: Use size 2 yellow yarn and wrap it around the middle of a wire stem.
Step 2: Fold the wire in half to form the flower pistil.
Step 3: Insert the yellow pistil through the center of the flower.
Step 4: Use green yarn to wrap around the wire stem for approximately 3 cm.
Step 5: Cut the yarn and secure it tightly.
Assembly
Gather all 10 flowers together.
Use green yarn to wrap and secure all the flowers into a single stem.
Make the finished flower stem approximately 10 cm long.
Using a yarn needle, sew the 3 leaves onto Row 3 of the soil.
Insert the flower stem into the center of the pot and arrange the flowers evenly in a circular shape.
Place the soil into the pot to secure the flower stem.
Tips for Success
- Pay attention to the eye markers on Row 11. The pattern has you crochet 20 SC before marking the first eye position, crochet another 8 SC before marking the second, and then finish with 20 SC. Keeping those markers in place until you attach the eyes will make the facial placement much easier to follow.
- Keep Row 17 of the pot easy to identify. This is the row worked with Ch 2 and 48 DC, and the instructions later tell you to fold Row 17 down. If your rows tend to blend together once you’ve finished crocheting, placing a removable marker near this row while you work can help you find it again quickly.
- Watch the direction of the leaf stitches. Each leaf begins with Ch 10, and the stitches are worked on both sides of that foundation chain. That construction is what allows the single row of stitches to travel around the chain and form the complete leaf shape. The pattern also asks you to leave a long tail afterward, so don’t trim that tail short because it will be used for sewing.
- Finish the soil stuffing before the last decreases become too small. The pattern specifically says to stuff after Row 15 and before Rows 16 and 17. Following that order gives you access to the opening before the final decreases close the soil section.
- Prepare all ten flowers before gathering the bouquet. Each flower gets its own yellow pistil and partially wrapped green wire stem. Completing those individual pieces first makes the final step, gathering all 10 flowers into one stem, much easier to organize.
- Use the final assembly instructions as your placement guide. The three leaves are sewn onto Row 3 of the soil, while the finished flower stem is inserted into the center of the pot. The flowers are then arranged evenly in a circular shape before the soil is placed inside to secure the stem.
Finishing & Styling Ideas
The final assembly is where this project really comes to life. Once the ten purple flowers are gathered together, try to spread the flower heads gently so the cluster looks rounded rather than flat. The pattern specifically calls for the flowers to be arranged evenly in a circular shape, which helps create that full hydrangea look.
The three green leaves add another layer around the base of the flower cluster. Because they are sewn onto Row 3 of the soil, they sit close to the center arrangement rather than being attached directly to the pot.
Don’t forget the face details either. The black embroidered smile on Row 10 and the pink blush beneath both eyes give the beige pot its personality. These tiny touches make the project feel less like a traditional floral decoration and more like a sweet amigurumi-style plant.
Once finished, the pot would be lovely on a craft-room shelf, desk, bedside table, or bookcase. Since the flowers are crocheted, you get the colorful look of a little hydrangea arrangement without needing to replace the blooms. It could also make a cute handmade gift for someone who loves flowers, plants, or small crochet decorations.

Common Questions
How many hydrangea flowers do I need to crochet?
The pattern calls for 10 hydrangea flowers. Each flower is made separately with purple yarn using a magic ring and four repeats of the petal sequence. After the pistils and stems are added, all 10 flowers are gathered together and secured into a single stem.
How many leaves are included in the pattern?
You’ll make 3 leaves using green yarn. Each leaf begins with a chain of 10, and the stitches are worked on both sides of the foundation chain. The pattern asks you to leave a long tail on each leaf so they can later be sewn onto Row 3 of the soil.
Where should the eyes be placed?
The eye positions are marked while crocheting Row 11 of the pot. The row is worked as 20 SC, mark the first eye position, 8 SC, mark the second eye position, and then 20 SC. The eyes are attached in those marked positions before continuing with Row 17.
What gauge and hook size should I use?
The original pattern does not provide a gauge or hook size, and it also does not specify yarn weights. Because those measurements are not included, there isn’t a pattern gauge or hook number to reproduce here.
How is the flower stem secured inside the pot?
After all 10 flowers are gathered and wrapped into a single stem, the pattern instructs you to make the finished flower stem approximately 10 cm long. The stem is inserted into the center of the pot, the flowers are arranged evenly in a circular shape, and the soil is then placed into the pot to secure the flower stem.
A Finished Hydrangea Pot You’ll Want to Display
This hydrangea pot crochet pattern is such a fun combination of amigurumi details and floral crochet. Between the smiling beige pot, rosy cheeks, dark soil, leafy base, and cluster of ten purple blooms, there’s plenty of personality packed into one small decorative project.
I especially like that the pattern is broken into manageable pieces. You can crochet each component separately, then enjoy watching the whole arrangement come together during assembly. Once that rounded flower cluster is sitting above the little smiling pot, it makes an instantly cheerful display piece.
If you make your own hydrangea pot, have fun choosing where to display it or who might appreciate it as a handmade gift. And if you like keeping crochet ideas handy for later, save this hydrangea pot crochet pattern to Pinterest so you can easily find it when your next flower-crochet mood strikes.
